
TL;DR:
- Gang sheet creation combines multiple designs into one optimized print layout, reducing waste and costs.
- Using dedicated software and strategic nesting improves efficiency and scaling capacity.
- Regular planning and layout optimization lead to faster production, lower errors, and higher profit margins.
Custom apparel printing eats money when you’re not careful. Wasted film, half-empty print runs, and designs scattered across multiple sheets without a plan can quietly drain your margins batch after batch. If you’re running a small shop or freelancing as a designer, these inefficiencies compound fast. Gang sheet creation fixes this problem at the source. This guide walks you through everything you need: preparation, layout strategies, execution, common mistakes to avoid, and how to measure real results once you start running optimized sheets.
Table of Contents
- What is gang sheet creation and why does it matter?
- Essential tools and resources for efficient gang sheet creation
- How to create a gang sheet: Step-by-step walkthrough
- Common mistakes and troubleshooting your first gang sheets
- What to expect: Results and optimization after your first runs
- The overlooked secret to scaling custom apparel with gang sheets
- Ready to streamline your apparel printing? Start with Transfer Kingz
- Frequently asked questions
Key Takeaways
| Point | Details |
|---|---|
| Gang sheets maximize efficiency | Combining multiple designs saves money and materials for every print run. |
| Prep and tools matter | Selecting the right software and materials is critical for smooth gang sheet creation. |
| Follow a proven process | Step-by-step layout and review prevents common mistakes and wasted materials. |
| Optimize for your business | Review results and continually refine your methods to scale up apparel production. |
What is gang sheet creation and why does it matter?
Understanding what a gang sheet is might seem basic, but the concept has serious implications for your production workflow. A gang sheet is a single large print sheet that combines multiple designs or design variations into one optimized layout before printing. Instead of printing each design individually on separate sheets of film or media, you fill one sheet with everything you need and print it all at once.
This approach is foundational to efficient apparel production. Whether you’re printing DTF (Direct-to-Film) transfers, screen print separations, or vinyl heat transfers, the principle is the same: maximize every square inch of your print media.
The DTF gang sheet benefits guide covers this well, but here’s the core value in plain terms:
- Less material waste: Empty space on a sheet costs you money. Gang sheets eliminate most of it.
- Faster production time: One print run covers multiple orders or design variations simultaneously.
- Lower cost per design: Spreading your ink and media cost across more designs reduces per-unit expense.
- Easier batch management: Organizing designs by garment type or color block reduces handling time during press and application.
- Scalability: Once you’ve built efficient sheet templates, scaling your volume requires almost no extra planning.
The layout strategy you use matters enormously. As noted in the dtf-gang-sheet-optimization-guide, expert approaches include Tetris-style nesting to fill gaps, grouping designs by size or garment type, using grid layouts for uniform designs, and maintaining a pre-print inventory of bestsellers.
“The shops that waste the least film aren’t the ones with the best printers. They’re the ones with the best layout habits.”
Essential tools and resources for efficient gang sheet creation
Once you understand the value of gang sheets, the next step is getting the right tools in place. You don’t need to spend thousands to start, but you do need to be deliberate about your setup.
Design software and builder tools
Your software choice determines how quickly and precisely you can build layouts. Here’s a comparison of the most commonly used options:
| Tool | Cost | Best for | Key feature |
|---|---|---|---|
| Adobe Illustrator | $21/month | Precision vector layouts | Advanced nesting, full control |
| Canva Pro | $15/month | Simple batch designs | Easy drag-and-drop interface |
| Dedicated gang sheet builders | Varies (often free) | DTF-specific workflows | Auto-nesting, preset dimensions |
| CorelDRAW | $249/year | Sign and apparel shops | Great color management tools |
| GIMP (free) | Free | Budget-conscious users | Raster editing, basic layouts |
Dedicated gang sheet builder tools have become increasingly popular because they’re designed specifically for this task. They auto-nest designs, enforce bleed settings, and often integrate directly with your print service provider’s workflow.
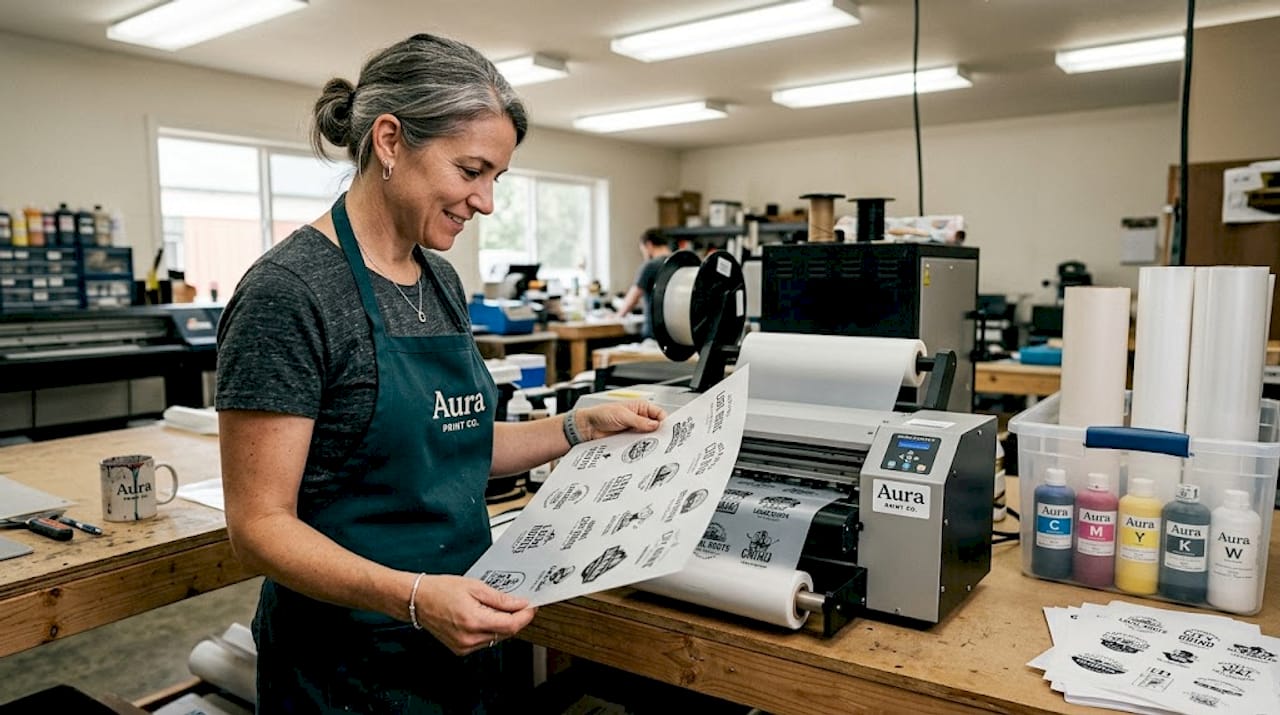
Materials and equipment you’ll need
The physical side of gang sheet production depends on your print method. For DTF specifically, you’ll need:
- DTF film: Available in rolls or sheets, typically 13" or 22" wide
- DTF-compatible printer: Modified Epson or dedicated DTF printer
- White ink and CMYK ink set: Both are essential for full-color DTF output
- Heat press: For transfer application after printing
- Hot melt adhesive powder: Applied to wet ink before curing
Understanding your material costs upfront helps you set accurate pricing. A basic 22" x 36" DTF gang sheet setup typically costs between $1.50 and $4.00 in materials depending on ink coverage and film quality.
Pro Tip: Build your most popular designs as ready-to-go gang sheet templates before orders even come in. This “inventory readiness” strategy, highlighted in the dtf-gang-sheet-optimization-guide, means you can fulfill repeat orders instantly without rebuilding layouts from scratch. It’s one of the highest-leverage habits you can develop early.
The apparel production optimization guide digs into these workflows in detail, including how to time your sheet prep with your order volume cycles.
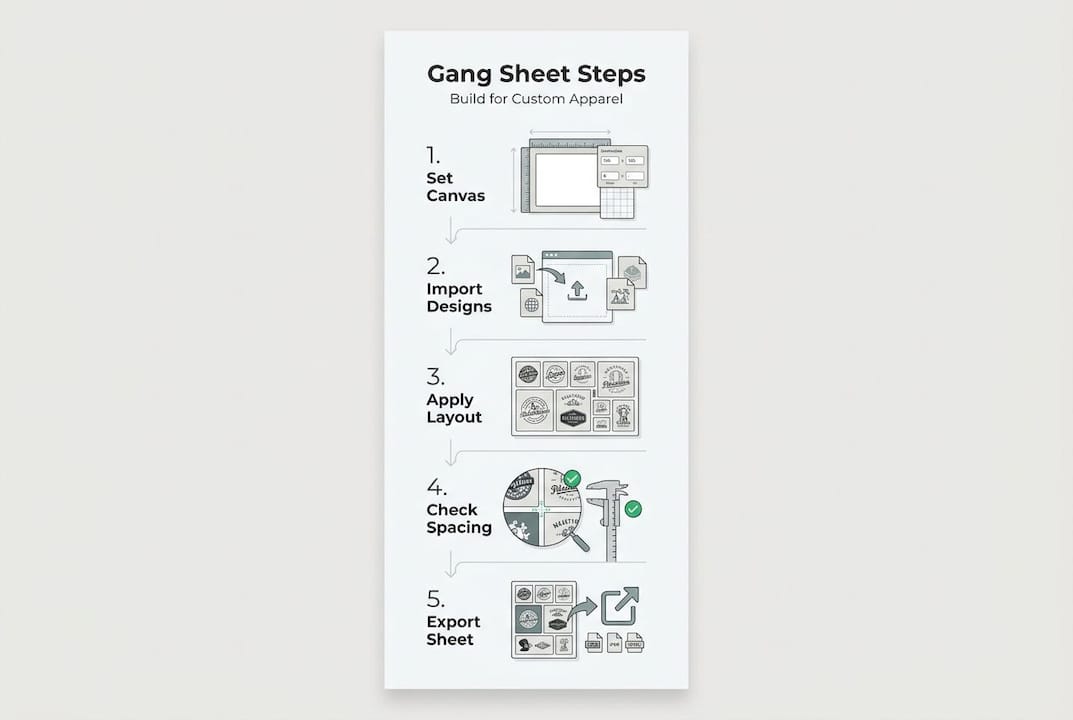
How to create a gang sheet: Step-by-step walkthrough
Now that you’ve assembled your tools and resources, you’re ready to build your first gang sheet by following these actionable steps.
Step 1: Choose your software and open a new document Set your canvas size to match your print media. Common DTF sheet sizes are 13" x 19", 22" x 36", or a custom roll length. Work in RGB color mode at 300 DPI minimum.
Step 2: Import your design files Bring in all designs as high-resolution PNG files with transparent backgrounds. Transparency is critical for DTF because it controls where ink is deposited.
Step 3: Apply layout strategies This is where the dtf-gang-sheet-optimization-guide strategies come into play: use Tetris-style nesting to fit irregular shapes around each other, group by garment type to simplify application later, and use grid layouts when working with uniform design sizes.
Step 4: Verify spacing and bleed Leave at least 0.25" between designs to prevent bleed overlap during pressing. Check that no design elements fall within 0.1" of the sheet edge.
Step 5: Proof the sheet thoroughly Zoom into every design corner. Check for low-resolution images, missing elements, and color accuracy.
Step 6: Export the final file Export as a high-resolution PDF or PNG at 300 DPI. Some printers require specific file formats, so confirm with your provider before exporting.
Here’s a reference table for the full process:
| Step | Main task | Watch out for |
|---|---|---|
| 1. Set up canvas | Match print media dimensions | Wrong color mode (use RGB) |
| 2. Import designs | High-res PNGs with transparency | White backgrounds mistakenly included |
| 3. Optimize layout | Nesting, grouping, grid strategies | Dead space between designs |
| 4. Check spacing | 0.25" gaps, edge margins | Bleed overlap between elements |
| 5. Proof | Resolution, missing elements, colors | Zooming out hides small errors |
| 6. Export | PDF or PNG at 300 DPI | Wrong file format for your printer |
The DTF builder comparison is a great reference for finding which software handles each of these steps best based on your experience level.
Pro Tip: Build a “bestseller block” at the top of every gang sheet. Pre-placing your top five most popular designs in a fixed area before adding new artwork means you always have high-velocity inventory on every run. The DTF workflow tutorial covers exactly how to integrate this habit into a repeatable production cycle.
Common mistakes and troubleshooting your first gang sheets
Even with a clear process, first-timers often run into issues. Here’s how to spot and fix the most common mistakes before they cost you time and materials.
Leaving too much dead space. This is the number one error for beginners. Layouts with large gaps waste material and inflate your cost per design. The fix is to actively nest designs after placing them, rotating elements to fill irregular gaps rather than defaulting to a rigid grid.
Misaligned designs. When designs aren’t perfectly straight, your heat press can cause inconsistent application across the sheet. Always use guides, snapping tools, or alignment functions within your software to lock designs into position.
Incorrect sizing. A design sized for a youth shirt placed on an adult-sized gang sheet without adjustment causes press and application problems. Double-check garment type and intended print size for every element before finalizing the layout.
Low-resolution artwork. Artwork that looks fine on screen can print blurry at 300 DPI. Always confirm actual pixel dimensions, not just the display resolution. A file labeled “300 DPI” but sized at 2" x 2" at 72 DPI native will print poorly.
Wrong file format on export. Some printers reject files that aren’t in a specific format. Always confirm whether your print service needs a PDF, TIFF, or PNG before you finalize and send.
Critical reminder: Never send a gang sheet to print without a full proofing pass. One misaligned or low-resolution design on a sheet ruins the entire run and eats both material and time costs. Print a test sheet if you’re unsure.
Check the DTF cost-saving tips guide for more on how proofing habits connect to overall cost control. The DTF quality checklist is also a practical resource to run through before every submission.
How do you improve with each batch? Keep a short log of what went wrong on each run: wasted space percentage, any reprints needed, and design issues caught post-print. Even informal notes help you recognize patterns and fix them systematically over two or three iterations.
What to expect: Results and optimization after your first runs
After troubleshooting and completing a few runs, you’ll want to measure your success and continue refining your process.
Here’s what to actively track after your first several gang sheet runs:
- Material savings per sheet: Measure how much usable film you’re consuming versus wasting. A well-optimized layout uses 85 to 95 percent of available print area.
- Production speed: Track how long it takes from order receipt to print-ready file. Most shops cut this time by 30 to 40 percent after the first few optimized runs.
- Error rate: Count how many sheets required reprints or corrections. This number should drop sharply after your first three to five runs.
- Cost per design: Divide your total sheet cost by the number of designs on that sheet. This figure should trend downward as your layouts improve.
- Order turnaround time: Gang sheet efficiency directly compresses fulfillment times, which is measurable and valuable to communicate to customers.
As highlighted by layout strategies in the DTF optimization research, pre-printing popular designs as a ready inventory strategy compounds these gains further. Shops that systematically pre-print bestsellers reduce their average order-to-ship time significantly because most orders involve repeat designs rather than all-new artwork.
Ongoing optimization means tracking which designs repeat across orders and pre-loading them onto sheets before demand arrives. If a logo or a specific design appears in 60 percent of your weekly orders, it should be on a pre-built block ready to print at any time.
To scale up, look at optimize production with gang sheets for guidance on when to increase sheet sizes, invest in wider-format printers, or introduce automation tools into your workflow.
The overlooked secret to scaling custom apparel with gang sheets
Most guides stop at the technical how-to. That’s useful, but the real leverage for your business comes from treating gang sheet creation as a systematic workflow rather than a one-time layout task.
Here’s what separates shops that scale from shops that stay stuck: the ones that grow aren’t necessarily printing better. They’re planning better. They’ve turned gang sheet prep into a scheduled, recurring business process rather than something they figure out ad hoc when an order arrives.
Think about the math. If you save just 10 percent of your production time per order through better gang sheet preparation, that compounds across your entire annual volume. At 200 orders per year, a 10 percent gain means 20 orders worth of time freed up. At 2,000 orders, it’s 200. That’s not a print-room efficiency win. That’s a capacity and revenue increase.
The gang sheet cost efficiency breakdown shows this clearly on the material cost side. The same principle applies to time.
The practical shift is this: stop building gang sheets reactively and start building them proactively. Schedule a weekly or bi-weekly planning block where you review your top-selling designs, anticipated upcoming orders, and pre-assemble gang sheet templates ready to go. When orders spike, you’re not scrambling. You’re printing.
Pro Tip: Block 30 to 60 minutes every Monday to review your order pipeline and pre-build gang sheet templates for the week. This one habit, sustained over months, creates a compounding efficiency that dramatically increases how many orders you can fulfill without increasing your hours.
Gang sheets aren’t just a printing technique. They’re a production philosophy. The shops winning in custom apparel right now have systematized every step, and gang sheet planning is where most of those gains originate.
Ready to streamline your apparel printing? Start with Transfer Kingz
As you up your gang sheet game and seek more support or advanced services, Transfer Kingz has the tools and resources to help you move faster and print smarter.

Transfer Kingz specializes in high-quality DTF transfers built for small businesses and production shops that need speed, precision, and consistency. Whether you’re handling intricate artwork or scaling to large batch orders, their platform handles it. Explore the Print Point services for streamlined ordering, check out how DTF shirt transfer innovations are reshaping custom apparel production, and learn how the platform manages intricate print transfer solutions that would challenge most standard print setups. When your gang sheet workflow is dialed in, Transfer Kingz is ready to execute it at scale.
Frequently asked questions
What is the best software for creating gang sheets for custom apparel?
Popular options include Adobe Illustrator, CorelDRAW, and dedicated online builders designed for DTF workflows. The best choice matches your file format requirements and how quickly you need to build layouts. As noted in the dtf-gang-sheet-optimization-guide, built-in nesting and grouping features are the most important capabilities to prioritize.
How can I save material when making gang sheets?
Apply Tetris-style nesting strategies to fill irregular gaps, group designs by garment type or size, and pre-plan your sheets before placing any artwork. These approaches consistently push usable print area above 85 percent.
What are common mistakes to avoid with gang sheet creation?
The most frequent errors include leaving large areas of dead space, misaligning designs, using low-resolution artwork, and skipping the proofing step. Each of these is preventable with a structured layout review process before you submit for printing.
How do I know if my gang sheet is ready to print?
Your sheet is print-ready when all designs are properly nested with at least 0.25" spacing, every element is at 300 DPI minimum, no artwork clips the sheet edge, and you’ve done a full alignment check at 100 percent zoom. Run through the dtf-gang-sheet-optimization-guide checklist as your final confirmation before export.
Recommended
- Gang Sheet Builders Explained: Smarter Custom Designs for DTF – Transfer Kingz
- Optimize your apparel production with gang sheets in 2026 – Transfer Kingz
- What is a gang sheet? Save costs & boost apparel printing – Transfer Kingz
- What is a Gang Sheet in DTF? Meaning, Benefits & How to Create One – Transfer Kingz
0 comments